This series takes a deeper look at how our engineers build digital financial services. Learn more about how they address large-scale technical challenges at Tala.
By: A. Abhishek, Android Lead Engineer
Long build times are something most developers despise as it breaks the flow of development and reduces developer productivity. Even small improvements in build speeds accumulated over dozens of developers over a period of time add up significantly. Prior to our Gradle optimization, engineers could watch 33 back-to-back soccer games in the amount of time they collectively run tests and builds every day. Even a sloth could travel across a soccer field approximately 114 times in the time our engineers were waiting for these tests to run.
With Gradle optimizations in place, however, we were able to save about 25 hours of CI time daily and 10 hours of cumulative developer time daily — that’s 9,100 hours a year.
Decreasing build time has been a focus for our Android team at Tala, given it is proven to increase developer productivity and unlock new efficiencies. Read on for seven ways we reduced build and test times.
1. Enable Build Cache
Gradle is incremental by default, which means it will not execute a task if its input and outputs have not changed since the last time it was executed. Most of the plugins we use have incremental tasks, and if we are writing our own tasks, we design them to be compatible with Gradle incremental builds.
Even so, incremental capabilities can only reduce the build time to an extent; when we switch branches or fetch a remote repository again (which CI does a lot), the tasks will be executed again. Enabling the build cache expedites this process. Gradle caches the output of tasks in the local .gradle directory, so when we want to execute a task, it will look for the output in the cache after the incremental check has failed. When a task is skipped due to the incremental feature, we see a UP-TO-DATE tag next to the task, and when the task output is fetched from the cache, we see a FROM-CACHE tag.
Caching is primarily beneficial in CI environments as subsequent builds can just get the output from the local cache instead of executing the task. At Tala, enabling this feature has brought our CI times down by an average of 50%.
To enable Gradle caching, add this line to your gradle.properties file:
org.gradle.caching=true
You can even go one step further and enable remote caching. Remote caching uses a cache in a server to store your task outputs which can be shared across machines. When one developer checks out a cached branch on their machine, they don’t have to build again. They can just download the output from the remote cache. This obviously is much more tedious to set up, but the nice people at Gradle will do it for you if you have Gradle Enterprise.
2. Go Parallel
It is advised to use all your CPU cores by building parallelly to bring down build times, and Gradle has a feature where it can build modules in parallel.
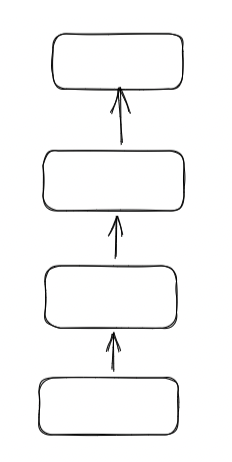
To utilize this feature, your codebase must first be modularized. Properly modularizing a codebase is by no means a trivial task, and if done incorrectly can certainly hamper your build speeds. To effectively modularize your codebase, expand horizontally rather than vertically. This strategy will allow Gradle to build multiple modules parallelly.
For example, your dependency graph should look more like this :
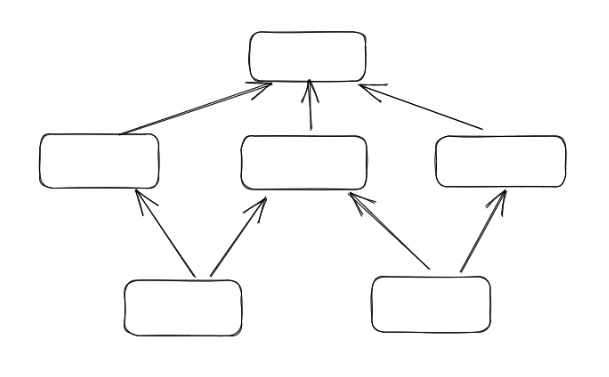
Rather than this:
To enable parallel builds, just add the line below to your gradle.properties file.
org.gradle.parallel=true
3. Reduce Build Variants (Android)
In any standard Android codebase, we will have a few variants to manage environments like QA, Prod, etc. All the combinations of build variants are then created for debug and release build types as well. So, using the above example, we will have four build variants qADebug, qArelease, prodDebug, and prodRelease. There are configuration costs for each of the build variants because Gradle will create separate tasks for each of them. If you think carefully, you do not need the qARelease variant because we will never release a QA environment build.
This configuration cost multiplies as we add more and more dimensions to the variants and can really add up in a project with lots of variants. Thankfully, the Android Gradle plugin provides an elegant way to disable the variants we do not need via the variantFilter block.
android.variantFilter { variant ->
   if (variant.getBuildType().name == 'release') {
       if (!variant.name.contains('Prod')) {
           variant.setIgnore(true)
       }
   }
}
Here we are disabling any release build types not in the Prod environment so that no tasks will be generated for them during the configuration phase, alleviating the project from creating any unnecessary tasks.
4. Running tests in parallel
Slow tests can also hamper developer productivity, and by default, the tests are not run in parallel. However, we can easily change that with a block of code in our build.gradle file:
test {
    maxParallelForks = Math.max(1,Runtime.runtime.availableProcessors().intdiv(2)) // half of CPUs but no fewer than 1
}
With this configuration, Gradle will spread your test execution to half of the available processors.
5. Keep Gradle and Plugins Up-To-Date
This is a no-brainer since the Gradle team keeps enhancing the build mechanism, improving the build speed significantly. We also keep updating the plugins we use because even the plugin maintainers actively convert their tasks to be incremental and cacheable. There is no point in enabling build caching if the plugins you use do not also have cacheable tasks!
6. Optimize Repositories
We tell Gradle where to look for our dependencies in the repositories{} block in the build.gradle file, but we also keep in mind that order matters. Gradle will go through your repositories one by one for each and every dependency defined. Therefore, be sure to order the repositories in descending order based on the number of dependencies they provide. For example, if I am fetching from three repositories: RepositoryA, RepositoryB and RepositoryC, and the number of dependencies they each provide are 3, 11, and 5 respectively, then our repositories block should look like this:

If you do not optimize this, then you will get a lot of HTTP errors while trying to fetch the dependencies the first time or whenever you update dependencies, eventually slowing the dependencies retrieval.
7. Configuration Caching
Configuration caching is a feature that can significantly improve build performance by caching the result of the configuration phase and reusing the output for subsequent builds. If there are no changes that can affect the configuration, Gradle has the ability to skip the configuration phase entirely.
We can enable configuration caching while building by adding the optional parameter, --configuration-cache:
gradlew assemble --configuration-cache
Or we can enable it in the gradle.properties file by adding:
org.gradle.unsafe.configuration-cache=true
Be mindful that this feature is still experimental and not yet compatible with many plugins. However, Gradle will fail the build if it realizes that it cannot cache the configuration phase rather than it silently failing.
Improving Build Speeds with Gradle
We’ve made significant strides to improve our build speeds with Gradle, due, in part, to these foundational tips. To actually see how much your builds have improved, check out Gradle Profiler. To analyze any shortcomings in your setup, use Gradle Build scans by adding --scan to your builds to generate an in-depth scan:
./gradlew assemble --scan
Improving build times for a project impacts the overall productivity of the developers and is something our Android team at Tala is working towards with utmost priority.