This series takes a deeper look at how our engineers build digital financial services. Learn more about how they address large-scale technical challenges at Tala.
By: A. Abhishek, Android Lead Engineer
As Android developers, Gradle is something people tend to run away from, especially during their junior years. It seems like a black box; newer Gradle users might use it to set up project properties in the `Android` block or maybe run some tasks. But during our growth as developers, we realize at some point we need to get a hold of the elephant and tame it. Gradle is a powerful tool at our disposal, and as Uncle Ben said: with great power comes great build time.
At Tala, not only do we rely on Gradle to manage our build, we use it heavily in our CI/CD pipeline as well. Gradle at its core is a task executor; it creates a Directed Acyclic Graph (DAG) of tasks with dependencies between them and executes them. Whenever we run any task, Gradle goes through three phases. Understanding Gradle’s lifecycles, or these three phases, makes Gradle more approachable even for the newest user.
1. Initialization Phase
This is the first phase of the Gradle build lifecycle and is used to set up the build environment.
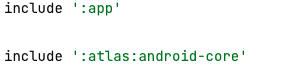
This phase figures out all the sub-projects involved in the build and the relationships between them. These subprojects have to be defined in settings.gradle file by using the include function.
Note that in Groovy (language used in Gradle) the brackets () are optional. For example, in the figure below, two sub-projects named app and atlas:android-core are included in the main project.
A project instance is created for all the sub-projects. Note the instance of the root project is named rootProject and all the instances of sub-projects reside in this instance.
Gradle also adds all the properties received from the command line and from gradle.properties file to the rootProject instance.
So at the end of the initialisation phase, Gradle has created a project instance for the rootProject and all the sub-projects and attached properties to them. This phase is executed only once regardless of how many tasks are being executed.
2. Configuration Phase
As mentioned earlier, Gradle is a task executor, and it creates a DAG of tasks it needs to execute. This DAG is created during the configuration phase.
Gradle first reads all the build scripts for the root project and subprojects and applies the plugins. Gradle plugins are a way to extend the functionality of Gradle by adding tasks and setting extra properties on the project instances.
The ever-present android {} configuration in our build scripts is a result of applying the com.android.application or com.android.library plugins. Creating custom plugins is a vast topic and beyond the scope of this blog.
Task Dependencies
Task dependencies can be created in multiple ways in Gradle and it is the configuration phase’s job to convert all these dependencies into a DAG of tasks. The most common way of defining task dependency is via the Task.dependsOn function which adds the parameters as a dependency to the task.
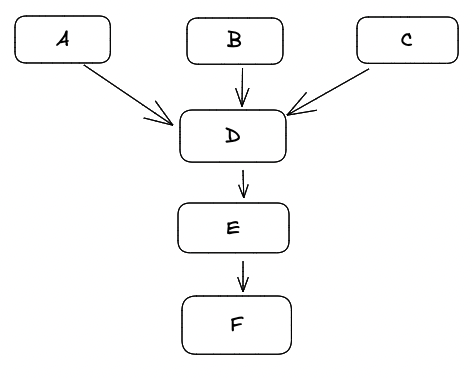
Take this configuration for example:
task A //defines task A
task B
task C
task E(dependsOn: ‘D’) //defines task E dependant on task D
//defines task D which is dependant on A, B and C
task D(dependsOn: [‘A’, ‘B’, ‘C’])
task F(dependsOn: ‘D’)
Will produce a dependency graph like this:
Utilizing Hooks
Gradle also provides various hooks into the lifecycle which can be very useful as it gives us a peek into the black box that is the Gradle lifecycle. It also helps us achieve certain actions which we can only perform after a certain stage in the lifecycle.
The project.beforeEvaluate and project.afterEvaluate methods are hooks to execute code before and after the configuration phase runs on a particular project.
project.beforeEvaluate {
println ‘Doing something before config phase’
}
project.afterEvaluate {
println ‘Doing something after config phase’
}
The project.gradle.taskGraph.whenReady method is a hook for when the taskGraph is ready. For example, the below code will print out all the tasks when the taskGraph is ready:
project.gradle.taskGraph.whenReady {
println project.gradle.taskGraph.getAllTasks()
}
3. Execution Phase
Once the task graph is generated in the configuration phase, we come to the execution phase, which, as the name says, executes those tasks. This can be the most time-consuming part of the process, especially if it has to execute a lot of tasks. Most tasks have inputs and outputs declared and, luckily, Gradle is smart enough to skip a task if its inputs have not changed since the last time it was executed. When we see “UP-TO-DATE” printed next to a task in our build logs, it means that Gradle has skipped the execution of this task.
A task basically has a list of actions that it has to perform, and performing a task inherently means performing all its actions. One of the ways to add actions to a task is with the << operator.
task HelloWorld // defines a task named HelloWorld
helloWorld << { // Adds a Action to the task HelloWorld which prints Hello
print ‘Hello ’
}
helloWorld << {
print ‘World’
}
// When you execute ‘gradle helloWorld’ it will print
Hello World
Every task that we define in the end is converted to a Gradle task object. We can also add actions to tasks using functions like:
doFirst(Action<? super Task> action)
doLast(Action<? super Task> action)
To fully harness the power of Gradle, a developer must understand each phase of Gradle’s lifecycles. Now, with this knowledge, you too can have great build time.